Previously called the Matic network, Polygon is becoming more and more important in the crypto world, both for his great scaling solutions, and his drastically lower fees. In this tutorial, you’ll learn how to add Matic Network to Metamask to start interacting with Polygon.
Haven’t installed Metamask? Learn how to create a new Metamask wallet here
What is The Matic Network – Now Polygon
The Matic Network is a protocol for building and connecting EVM (Ethereum Virtual Machine) compatible blockchain networks. Simply put, is a secondary scaling solution for Ethereum, also defined as an L2 (Layer2) chain.
These types of chains work on top of existing blockchains bringing substantial advantages. The Matic network, for example, works on top of Ethereum which is known to be slow and expensive to use, for a number of different reasons.
Ethereum can process ~14 transactions per second with each transaction having costs varying between $25 and $1000+, this volatility is caused by times of high network congestion, making life difficult and unpredictable for all but the richest of users.
This is a big problem for anyone wanting to use Ethereum-based smart contracts or simply transfer tokens, as gas fees can quickly mount up and cost hundreds or even thousands of dollars.
Scaling solutions like Polygon, with its 65,000 transactions each second, make things cheaper by processing some of those transactions elsewhere. In Polygon’s case, batches of transactions are processed on Polygon’s proprietary proof-of-stake blockchain
This cuts costs since you only have to pay for a fraction of a single Ethereum transaction while making transactions faster.
Now that we’ve gone through a brief overview of what Polygon is, let’s understand how to add Matic network to Metamak.
MetaMask, unfortunately, doesn’t ship with Polygon pre-connected, leaving you the effort to add it.
In this tutorial, you will learn how to add Matic network to Metamask, setting up the RPC provider.
How to Add Matic Network to MetaMask – Polygon
I’ll assume you already have MetaMask installed on your browser, and have already created a wallet. If not, you can read this guide that will walk you through How to create a MetaMask wallet.
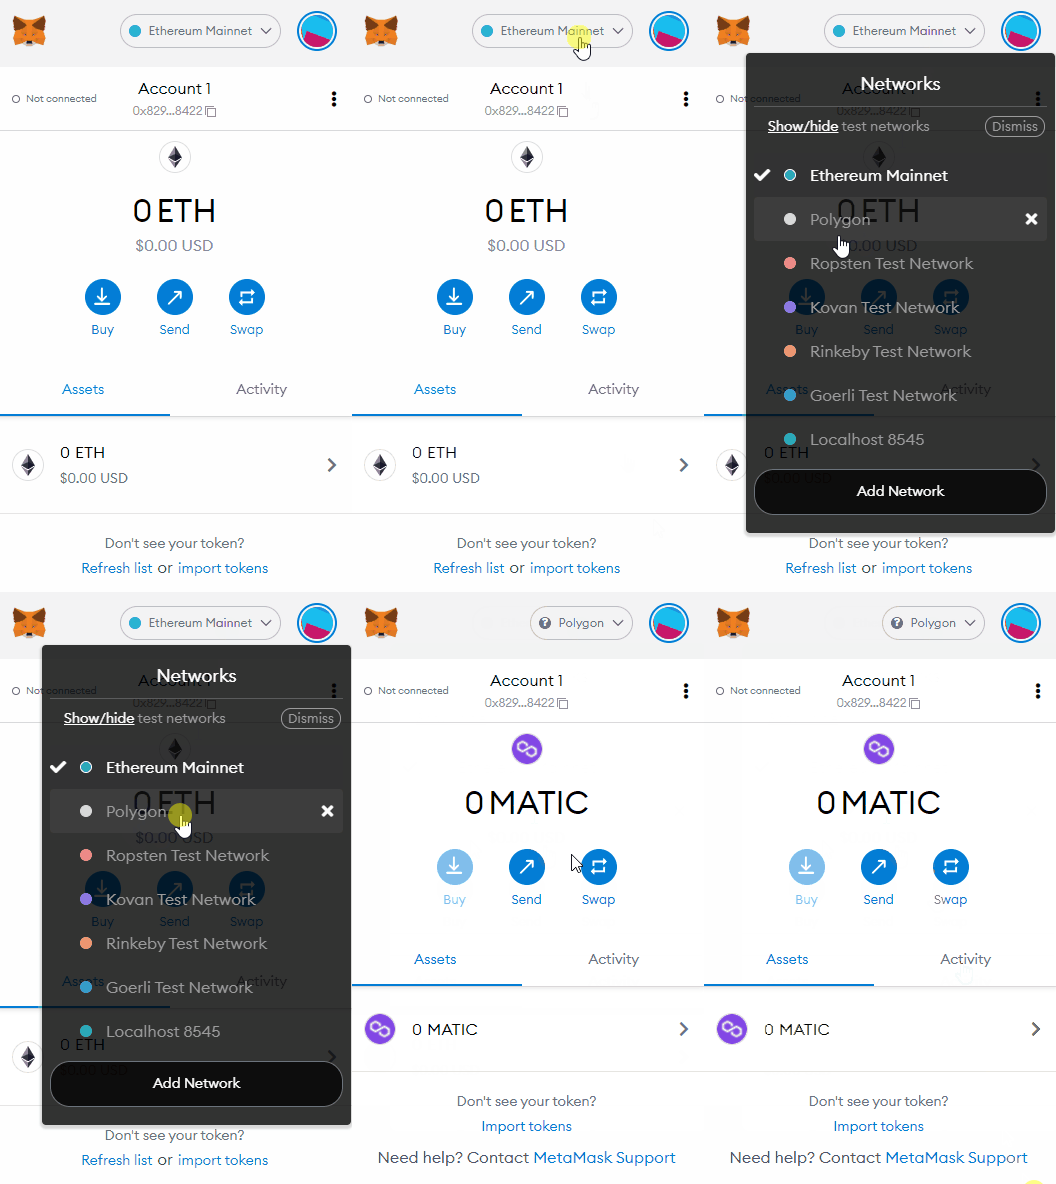
First of all, you’ll need to open the MetaMask extension:
- Click on the networks dropdown menu
- Scroll down all the networks
- And click on “add network”:

At this point you should be redirected to the following form on the Metamask website, where you’ll need to fill in the information needed to connect to the Matic network:

In the form input, insert the following settings:
- Network Name: Polygon
- New RPC URL:
- ChainID: 137
- Symbol: MATIC
- Block Explorer URL: https://polygonscan.com/
Network represents the name of the network you are trying to connect to, in this case, Polygon.
The RPC URL is the address of the Polygon node you’ll be interactive with when sending and retrieving transactions from your Metamask wallet. It might happen that an RPC node goes down, in case this happens to the URL I’ve provided, you might want to try these alternatives:
- https://rpc-mainnet.matic.network
- https://rpc-mainnet.maticvigil.com
- https://rpc-mainnet.matic.quiknode.pro
ChainID is the ID of the Ethereum chain, “symbol” on the other hand, is the Symbol of the native cryptocurrency on that chain.
Lastly, BlockExplorer represents the explorer related to the blockchain you’re connecting to. Her you’ll be able to see transactions and Smart contracts interactions. In the case of Polygon, the block explorer is polygonscan.
Once filled in, just click on save and you’ll be able to see Polygon in your Networks.

To test if the connection between your Metamask wallet and the Matic network has been successful, you might want to connect OpenSea and see if it can see your Matic tokens. If not, try to change RPC URL as described before.
Well done 🎉 You’ve just learned how to add the Matic network to Metamask and can now start interacting with Polygon!


