Cryptocurrencies have recently become popular, opening endless possibilities to companies, individuals, and DAOs. If you want to learn how to create and deploy an ERC20 Token In 20 minutes, that’s the right place to be.
In this tutorial, you’re going to understand how to create a cryptocurrency using Solidity and the ERC20 Token standard (Ethereum request of comment) maintained by OpenZeppelin.
We will first write the Smart Contract using REMIX IDE, an online IDE specifically made for Ethereum development with Solidity. We’ll then set up a local environment using Hardhat to deploy your own cryptocurrency on the Mumbai Polygon Testnet.
By the end of this tutorial you’ll learn:
- Develop and deploy an Ethereum Smart Contracts using the IX IDE.
- How to create and deploy an ERC20 Token with Solidity.
- Setup a local Ethereum development environment using Hardhat.
- Deploy a cryptocurrency on Polygon Mumbai.
- Visualize your own cryptocurrency on MetaMask.
- How to start your own cryptocurrency.
It is not assumed any previous Solidity knowledge, although is suggested to have some previous programming knowledge before starting this tutorial. If you don’t know where to start, I highly suggest you go and check the complete web3 roadmap (Updated this year).
That said, let’s dig straight into how to develop and deploy an ERC20 token.
How To Create an ERC20 Token: Set up The Environment With REMIX
We’ll learn how to create and deploy an ERC20 Token Smart Contract using REMIX, an easy-to-use, free, with a great Solidity compatible IntelliJ feature, and decent compile-time errors, IDE.
Navigate to remix.ethereum.org, open the contacts folder, and create a new file called “Token.sol”:
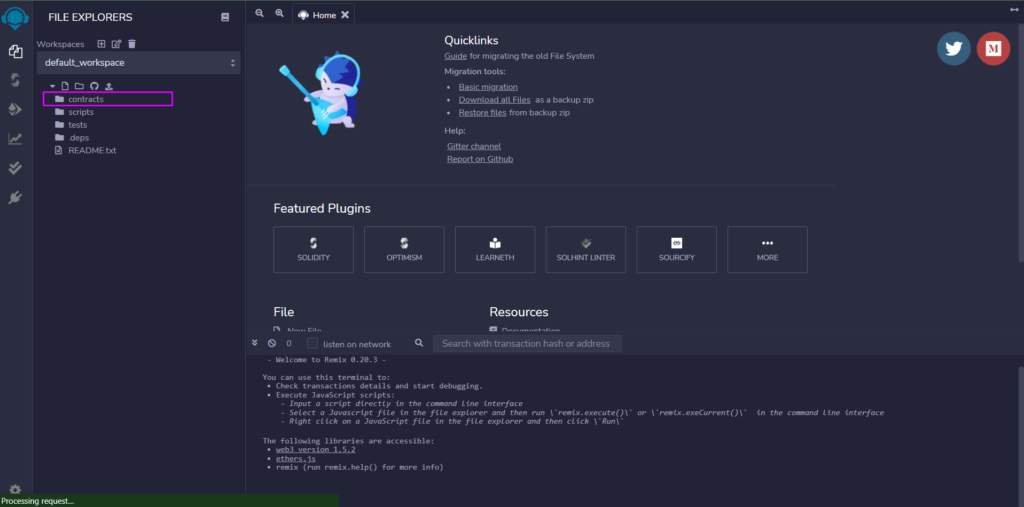
Whenever a new Solidity file is created, it’s mandatory to add the License-identifier and the pragma to specify the Solidity version the compiler should use to build our code.
In the Token.sol file, write the following code:
// SPDX-License-Identifier: GPL-3.0

pragma solidity ^0.8.0;
The “^” means the code is compatible with any version of the compiler from Solidity 0.8.0 to 0.8.9.
Now we need to import the ERC20 token contract from OpenZeppelin, but first, let me briefly go through what is an ERC20 Token, important to understand if you want to create your own cryptocurrency.
If you’re already familiar with this concept, feel free to skip to the next paragraph.
How to Create and Deploy an ERC20 Token: What is an ERC20?
According to the official OpenZeppelin documentation:
“An ERC20 token contract keeps track of fungible tokens: any token is exactly equal to any other token; no tokens have special rights or behavior associated with them. This makes ERC20 tokens useful for things like a medium of exchange currency, voting rights, staking, and more.”
Simply put ERC20 is nothing more than a class, with its methods and members, that runs the logic of what we commonly call cryptocurrencies, with a broader meaning though, as it also finds applications in other use cases.
OpenZeppelin on the other hand is considered the standard library maintaining ERC contracts classes.
If you want to read more about the ERC20 token standard, here’s a couple of resources:
Now that we have a brief understanding of why we’re importing the OpenZeppelin library, and what ERC20 means, let’s continue learning how to create and deploy an ERC20 Token.
How to Create and Deploy an ERC20 Token
Import the OpenZeppelin ERC20 contract in the Token.sol file:
// SPDX-License-Identifier: GPL-3.0

pragma solidity ^0.8.0;

import "@openzeppelin/contracts/token/ERC20/ERC20.sol";
And initialize the Token, inheriting from the ERC20.sol contract:
// SPDX-License-Identifier: GPL-3.0

pragma solidity ^0.8.0;

import "@openzeppelin/contracts/token/ERC20/ERC20.sol";


contract DevToken is ERC20{
}
Here we’re declaring a new contract called “DevToken”, using the Solidity keyword contract, while inheriting from the ERC20 OpenZeppelin’s contract using the “is” keyword.
Inheriting from the ERC20 contract will give us access to methods like _mint() and balanceOf(). If you want to take a look through all the available methods, you can check the official ERC20 documentation.
The next step is to create a cryptocurrency is to call the contract’s constructor and provide the name and symbol of the Token. To do so, inside the contract, write the following code:
contract DevToken is ERC20{
    constructor() ERC20("DevToken", "DVT"){

    }
}
At this point your code should look like this:
// SPDX-License-Identifier: GPL-3.0

pragma solidity ^0.8.0;

import "@openzeppelin/contracts/token/ERC20/ERC20.sol";

contract DevToken is ERC20{
    constructor() ERC20("DevToken", "DVT"){

    }
}
Great!🎉 One last step before testing our own Cryptocurrency and moving to more complex topics, we now need to effectively deploy our ERC20 Token.
How To Create an ERC20 Token: Mint The Cryptocurrency
As said before, inheriting from the ERC20 contract, gives us access to the _mint() method used to create new tokens, and send them to a given address, exactly what we need now.
Minting is defined as the process of validating information, creating a new block, and recording that information into the blockchain. Simply put, “mint” means: creating something, like a number of Tokens, or an NFT, and saving it on the blockchain.
Let’s say we want to create 1000 tokens and send them to our wallet, to achieve this, we can add the following code in the constructor:
contract DevToken is ERC20{
    constructor() ERC20("DevToken", "DVT"){
        _mint(msg.sender,1000*10**18);
    }
}
There’s a lot going on here, let’s take a second to understand it:
First of all, we’re calling the _mint() function, which is responsible to issue the tokens, and wants two parameters:
- to: address of the wallet/contract that will receive the tokens,
- amount: amount of tokens to send.
The “to” argument, is taken from msg.sender, a special variable which value is the address of the wallet/contract calling the contract. The amount, on the other hand, needs to take care of the decimals, and that’s why we’re passing such a big number, let me go through it for a second.
A Note On Decimals
When dealing with cryptocurrencies you may want to be able to send arbitrary amounts, like 0.004ETH. Unfortunately, Solidity and the Ethereum Virtual Machine do not support decimals: only integer numbers can be used. This means that only whole numbers can be sent (1, 4, 5), and this, of course, poses an issue.
So what’s the workaround?
It’s very simple, a token contract can use larger integer values (the EVM supports 256-bit integers) so that a balance of 1000000000000000000 represents 1 ETH with 18 decimal places, hence a transfer of 4000000000000000 will correspond to 0.004ETH being sent.
We that in mind, when calculating our total supply, we have to take account of the total amount of tokens, including the decimal places we want to have.
If you want a total max supply of 1.000.000.000 tokens, with 18 decimal places, like Ethereum and many other cryptocurrencies have, you want to pass 1000000000*10**18 that is (1000000000000000000000000000).
On the other hand, when sending 2 tokens the method to call will actually be:
transfer(recipient, 2 * 10**18);Ok now that we understand what’s going on in the mint function, let’s test our ERC20 Token contract.
Deploy Your ERC20 Token Cryptocurrency
On REMIX, click on the Solidity icon on the left side of the screen, and click on compile. You might also want to activate auto compile, to allow REMIX to listen for code changes, and compile your code.
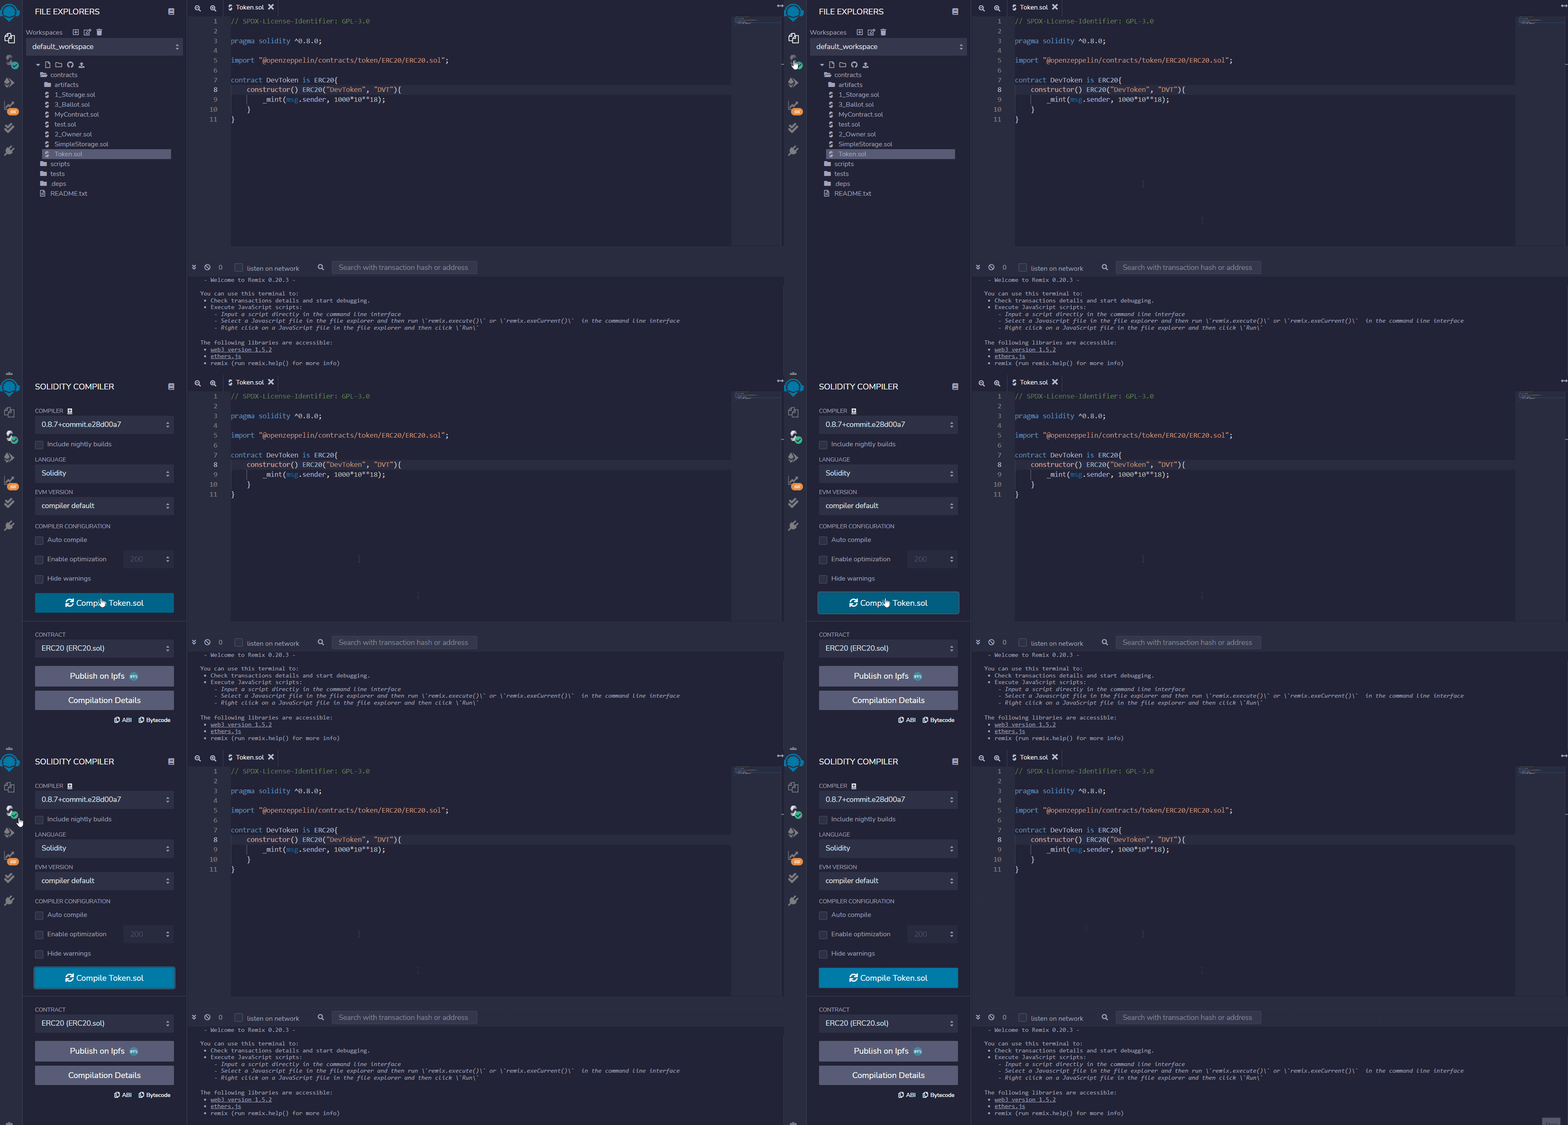
This will compile the Token.sol code, populating the artifacts folder with our Token’s Contract abi (application binary interface) and their binary version, used to deploy it on the blockchain.
Now that we have our artifacts, click on the Ethereum logo under the Solidity icon, select your contract in the dropdown menu, and click on deploy:

Congratulations! 🎉 If everything worked as expected, you’ve just created and deployed an ERC20 token!
Interact With Your First Cryptocurrency
Remember? When deployed, our smart contract should have issued 1000 tokens to our wallet! If you watch, right above the Deploy button, there’s the “account” field:

That’s the address of the wallet we used to deploy our ERC20 Token contract, we can say that because there’s some Ethereum missing, the Gas fees we paid to deploy the contract on the Ethereum Virtual Machine.
If everything worked as expected, we should now see the issued amount of tokens in the balance of our wallet’s address.
To test this out, as you can notice, right under the deploy button, and “Deployed Contracts”, there’s your deployed ERC20 token. Clicking on the dropdown menu will give you access to all of the ERC20 methods, that your contract has inherited or implemented:

The color of the buttons represents whether the representing function modifies any value on the blockchain, costing Gas (Orange), or it’s a simple view function just reading and returning a value (Blue).
Between those buttons, there’s one saying “balanceOf“, it requires an address as an input and will retrieve the associated amount of ERC20 Tokens. Let’s use it:
- Copy the wallet address clicking on the “copy” icon near the wallet address.
- Scroll down in the token methods and search for “balanceOf”.
- Paste the wallet address in the field.
- Click the blue balanceOf button.
- Check the amount.
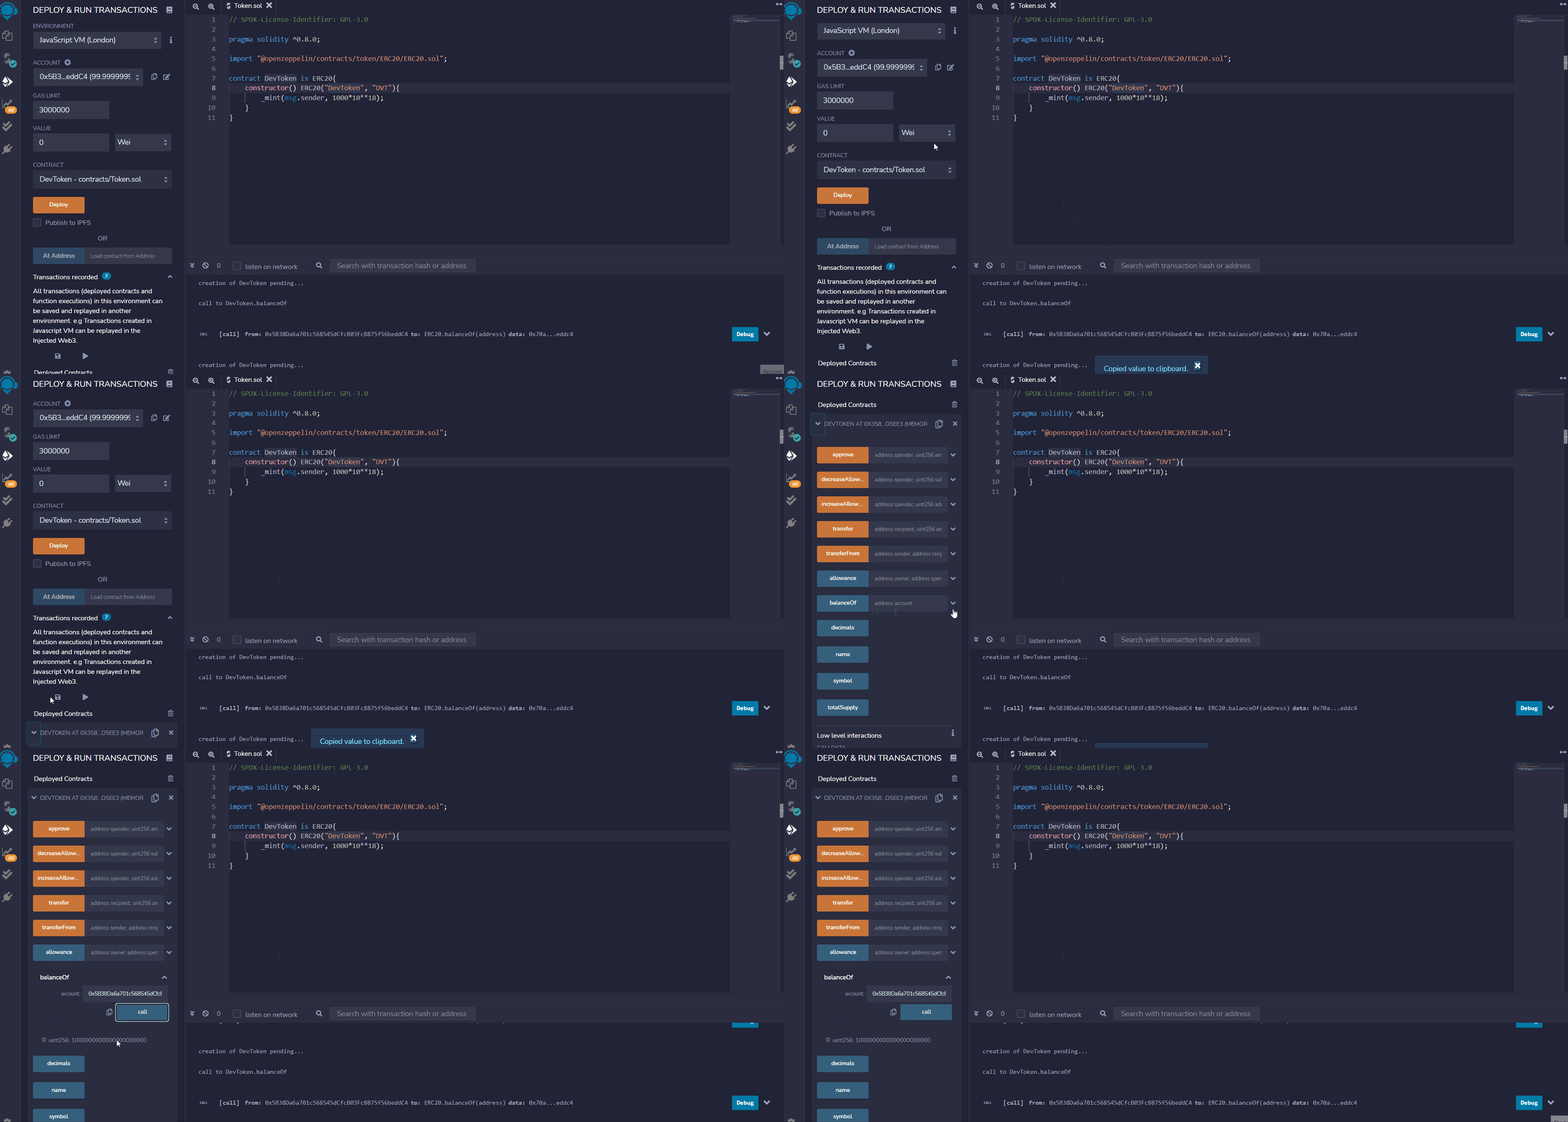
Well done, you’ve just created your own cryptocurrency! 🎉
Unfortunately, though, there are two issues at the moment:
- Our Token is not yet accessible from outside REMIX because currently deployed on the Remix EVM, a virtual machine that acts as a blockchain, not accessible by anything except your REMIX instance.
- Instead of issuing all the tokens on deployment, as we’re doing now, we might want to issue the tokens as a reward, as a consequence of an action, or simply in small batches.
Let’s first address the first issue, how to handle token supply.
Note: REMIX uses a hosted virtual ethereum environment, that can be compared to a testnet but it’s not publicly accessible outside the environment itself. Your contract won’t be deployed on the actual Ethereum mainnet, nor in a publicly accessible testnet.
How to Develop an ERC20: Create A Token Supply That Works
When you need to create your own cryptocurrency supply, we have 3 main choices:
- Fixed Supply
- Uncapped Lazy Supply
- Capped Lazy Supply
At this point, our token has a Fixed supply issued on deployment, let’s explore what it means, and the alternatives we have when developing our cryptocurrencies.
Fixed Supply
The total supply of the token is issued on deployment and sent to the deploying wallet address.
In this case, we choose a total supply beforehand and issue the whole amount to our wallet when the contract’s constructor gets called, leaving us the effort of distributing the tokens among different holders.
If we don’t want to issue all the tokens at once, though, we should opt for a lazy minting approach.
Uncapped Lazy Supply
Tokens aren’t minted and issued in a unique batch on deployment, but in small quantities and sent to the specified wallet(s), consequently to one or more actions.
In this case, the total max supply is regulated through economic-driven principles and not on a hard-coded value.
Think of a Miner validating a transaction and getting tokens back as a reward, or a user stacking their tokens to receive periodic rewards.
The absence of a hardcoded Max supply, though, could make your token inflationary, incurring a loss of value over time, or worst putting its security at risk. Even if this goes outside the focus of this tutorial, is good to understand that we can, and should, cap our supply.
Capped Lazy Supply
Like in the Uncapped Lazy Supply mechanism, the tokens are issued in small quantities, with the only difference that here the max-supply is decided beforehand and hardcoded in the smart contract, or passed on deployment.
In this tutorial, we’re going to broadly explore all the methods to create the supply of our Tokens.
ERC20 Token Supply – Fixed supply
Let’s say we want a token with a fixed supply of 1000 Dev Tokens (like we did in our code) initially allocated to the wallet that deploys the contract, to do so we simply called the _mint() private function inside the Token Constructor:
// SPDX-License-Identifier: GPL-3.0

pragma solidity ^0.8.0;

import "@openzeppelin/contracts/token/ERC20/ERC20.sol";

contract DevToken is ERC20{
    constructor() ERC20("DevToken", "DVT"){
        _mint(msg.sender,1000*10**18);
    }
}
Knowing that the constructor gets called only once, on deployment, this smart contract not only transferred 1000 tokens (the amount has 18 decimal places: see a note on decimals section) to our wallet but made it also impossible to mint any new token, not having an exposed _mint() function in its code.
We can check the token balance of the address that deployed the token by calling the balanceOf() method, just like we did before.
So, what if we want to issue tokens over time and not in a unique batch?
ERC20 Token Supply – Uncapped Lazy Supply
To achieve this we can simply move the mint function from our constructor to a new public function that can be called under different circumstances:
// SPDX-License-Identifier: GPL-3.0

pragma solidity ^0.8.0;

import "@openzeppelin/contracts/token/ERC20/ERC20.sol";

contract DevToken is ERC20{
    constructor() ERC20("DevToken", "DVT"){}

    function issueToken() public{
        _mint(msg.sender, 1000*10**18);
    }
}
In this case, every time issueToken() is called, the caller will receive that amount of tokens. Of course, we can also pass arguments to vary the issued amount of coins or the receiver:
// SPDX-License-Identifier: GPL-3.0

pragma solidity ^0.8.0;

import "@openzeppelin/contracts/token/ERC20/ERC20.sol";

contract DevToken is ERC20{
    constructor() ERC20("DevToken", "DVT"){}

    function issueToken(address receiver, uint256 amount) public{
        _mint(receiver, amount);
    }
}
The issue here is that, without any further control, there’s no limit to the number of tokens a user can issue. As a workaround, we can cap the total supply of the Token.
ERC20 Token Supply – Capped Modular Supply
To add a max supply to our Token, we can use the ERC20Capped OpenZeppelin library.
ERC20Capped is a sub-class of ERC20Mintable that in turn inherits from the standard ERC20 contract. This allows us to substitute the ERC20.sol library in our code, with ERC20Capped, while maintaining methods such as _mint() and balanceOf().
We’ll also need to specify a cap value by passing a uint256 argument to our Token constructor and feeding it into the ERC20Capped constructor.
Let’s import the ERC20Capped library from OpenZeppelin, and add the following code to the Token.sol contract:
// SPDX-License-Identifier: GPL-3.0

pragma solidity ^0.8.0;

import "@openzeppelin/contracts/token/ERC20/extensions/ERC20Capped.sol";

contract DevToken is ERC20Capped{
    constructor(uint256 cap) ERC20("DevToken", "DVT") ERC20Capped(cap){
}

    function issueToken() public{
        _mint(msg.sender, 1000*10**18);
    }
}
We can now test our Capped token using REMIX, just like we did before:
- Click on the Solidity Icon and compile your code
- Select your Token contract from the dropdown menu
- Insert the cap amount in the deploy field
- Click on Deploy
- Click on the “cap” button method to retrieve the cap value
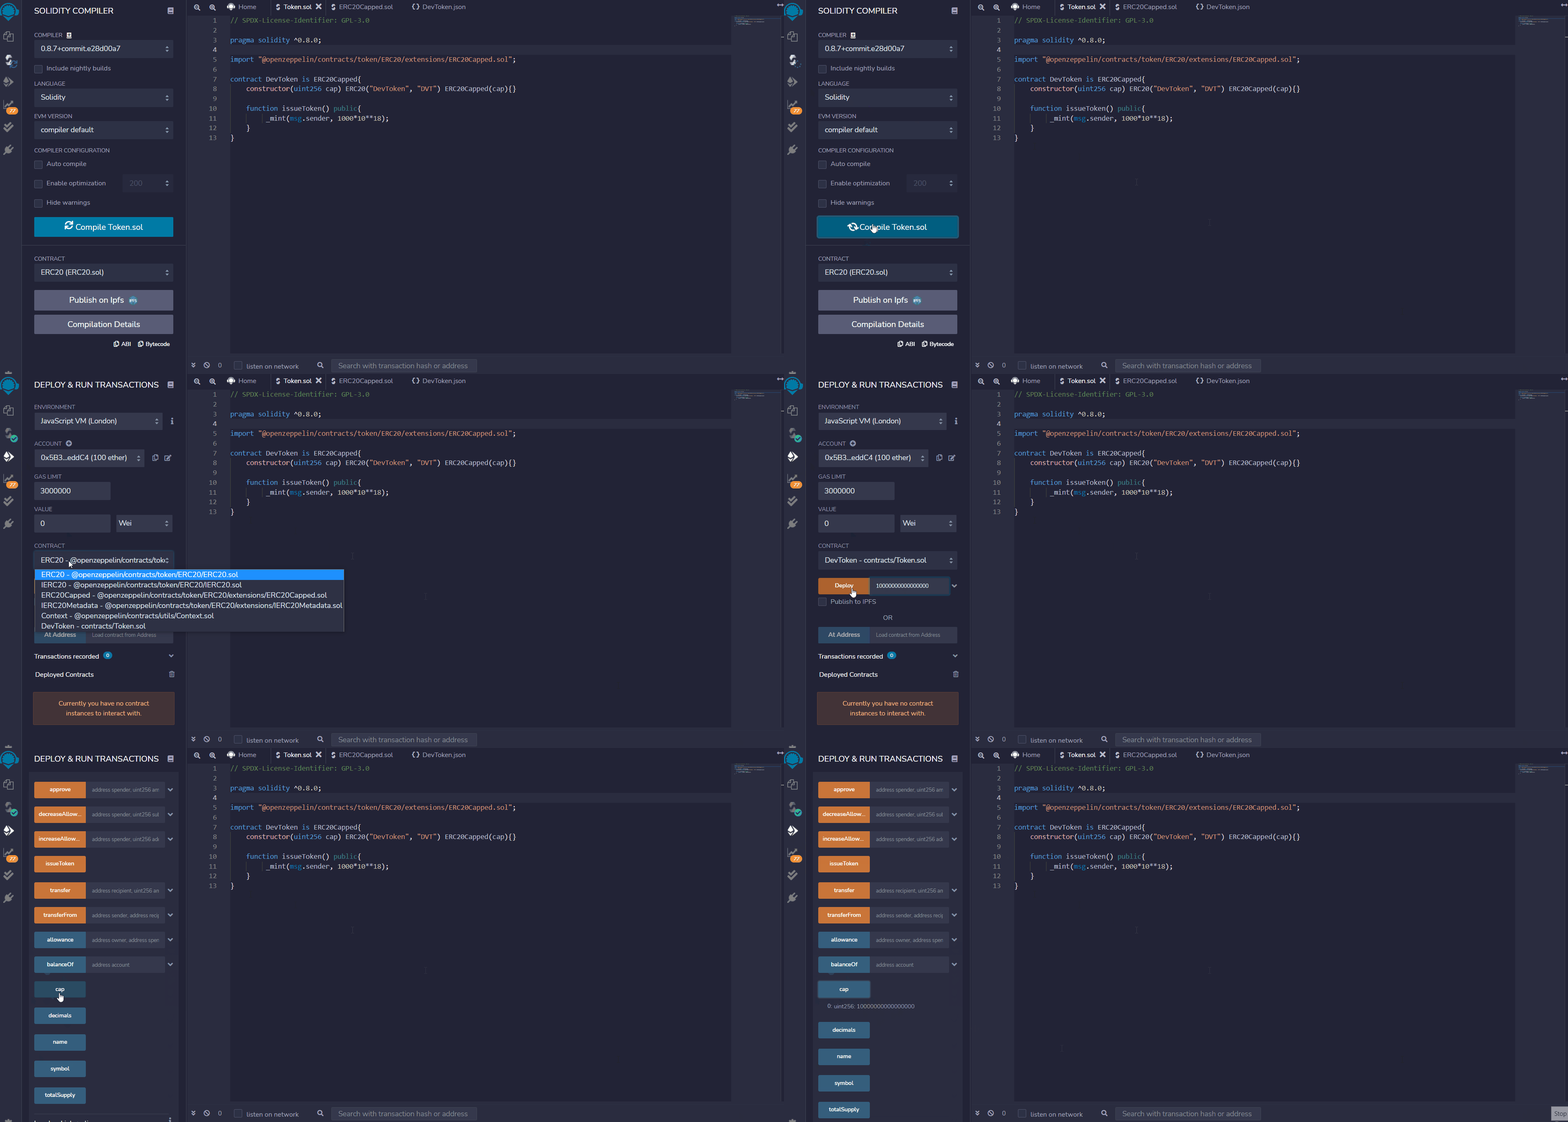
As you can see, in the example, we’ve inserted a cap value of 10000000000000000 that, considering the 18 decimal places, corresponds to a max supply of 0.01 DVT. Using the issueToken() method will now revert the transaction throwing a “cap exceeded” error:

Now that we have a mintable Token there is one issue left to solve: everyone can mint it by calling the issueToken() function, and that rises a huge security issue. Gladly, there is a solution to it: Owned contracts.
How to Create a ERC20 Token – Security and Access Control
Copying what the OpenZeppelin documentation on access-control tells us:
Access control, or “who is allowed to do this thing”, is incredibly important when dealing with smart contracts. The access control of your contract may govern who can mint tokens, vote on proposals, freeze transfers, and many other things.
It is therefore critical to understand how you implement it, lest someone else steals your whole system.
The most common and basic form of access control is the concept of ownership where there’s only an account allowed to perform sensitive tasks on a contract (the owner). This approach is perfectly reasonable for contracts that have a single administrative user.
OpenZeppelin provides Ownable for implementing ownership in contracts.
To use it, we’ll need to import the contract in our code, add it as a super-class of our Token contract, just like we did before, and add a function modifier to the issueToken() function ADD LINK:
// SPDX-License-Identifier: GPL-3.0

pragma solidity ^0.8.0;

import "@openzeppelin/contracts/token/ERC20/ERC20.sol";
import "@openzeppelin/contracts/access/Ownable.sol";

contract DevToken is ERC20, Ownable{
    constructor() ERC20("DevToken", "DVT"){}

    function issueToken() public onlyOwner{
        _mint(msg.sender, 1000*10**18);
    }
}
As we can notice, the Token contract is now inheriting both from the ERC20, and Ownable contract, this gives us access to the onlyOwner function modifier applied to the issueToken() function.
onlyOwner will run every time issueToken() gets called, verifying if the caller is the owner of the contract.
By default, the owner of an Ownable contract is the account that deployed it, which is usually exactly what you want.
Now that we have a reasonable understanding of how to design our token supply and how to secure its minting process, let’s learn how to deploy our token to a real and accessible blockchain, setting up a local development environment using Hardhat.
Set Up Your Local Blockchain Developer Environment
If we want to transfer the just created Token to another wallet, list it on an exchange, or simply use it in the real world, REMIX won’t be enough. To deploy an Ethereum smart contract to a public blockchain, such as Polygon or Ethereum, we’ll need to set up an Ethereum development environment like Hardhat or Truffle.
In this tutorial, we’ll use Hardhat, and assume you have VSCode already installed on your device.
Start by creating a new folder:
mkdir myFirstTokenNavigate to the project folder, install Hardhat and the dependencies needed to compile and test our Token smart contract:
yarn add hardhat @nomiclabs/hardhat-waffle @nomiclabs/hardhat-ethers ethers ethereum-waffleYou can learn more about the dependencies we’re installing, in the official Hardhat documentation.
Once installed initialize the Hardhat setup wizard by running:
npx hardhat
Select:
Create a basic sample project > leave default root > add a .gitignore.
This will populate our project directory with the default Hardhat files and folders.
If you’re not familiar with some of the just created files and want to dig deeper into what those are, check out the create your first DApp with solidity guide.
The next step will be to modify the hardhat.config.js file that contains the configuration settings to connect with running blockchain instances, but first, let’s grab our Node Provider Endpoint URL.
Grab Your Mumbai Provider Endpoint Using Alchemy
When deploying something on the blockchain, you’ll need a node responsible to run your smart contract, to do so you have two options:
- Spin up your own Ethereum node.
- Use a third party node provider like Alchemy or Infura.
Running your own node is usually discouraged, as it’s hard to maintain, is difficult to scale, needs to be upgraded, and should ensure state consistency, requiring some serious constant engineering effort. (read more about Nodes as a Service here)
In this case, we’ll use Alchemy as a Mumbai Node provider, as it’s completely free, easy to set up, and has stunning features.
Navigate to alchemy.com and create a new account:
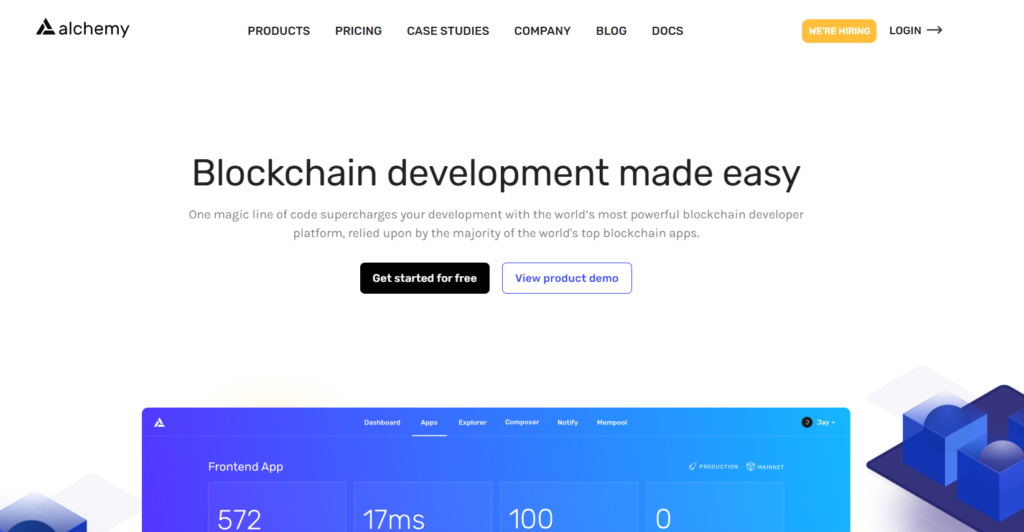
Once logged in, click on “+ CREATE APP“:
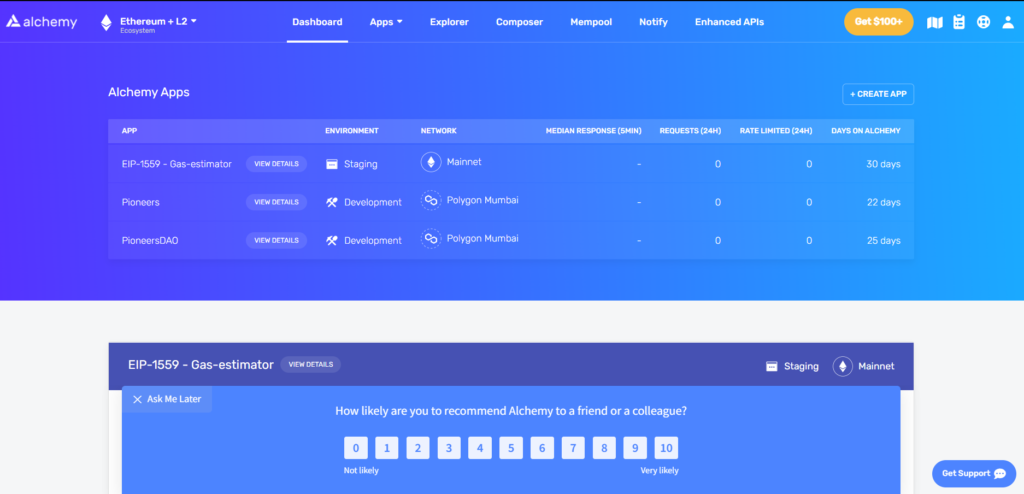
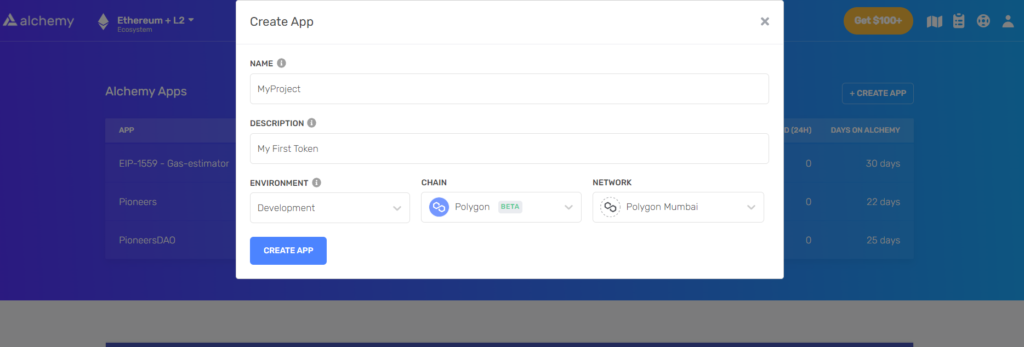
And fill in the fields as follow:
Name: MyProject
Description: My First Token
Environment: Development
Chain: Polygon
Network: Polygon Mumbai
And click on CREATE APP.
Search for the newly created app under Alchemy Apps, and click on it.
Once on the app page, click on “VIEW KEY“, and copy the HTTP Endpoint:

Now that we have the Polygon Mumbai endpoint copied, let’s modify our hardhat.config.js file.
Modify The hardhat.config File
We’re going to deploy our token to the Mumbai Polygon Testnet, but what’s explained in the following chapter, is applicable for all the Blockchain networks built on top of Ethereum (just change the hardhat.config.js setting to adapt to the desired chain).
Open the hardhat.config.js file, in the root directory of your project and add the following code inside the module.exports object:
module.exports = {
  solidity: "0.8.4",
  networks:{
    mumbai:{
      url: 'YOUR ALCHEMY POLYGON MUMBAI ENDPOINT',

    }
  }
};
The next step is to add the private key of the wallet we want to use the deploy the Token on the blockchain, but first, we need to install the dotenv library to keep our private key secure
Let’s start by installing dotenv.
Install dotenv
In the terminal, inside the project folder, install the dotenv library by typing:
yarn add dotenvand create a new .env file in the root folder of your project.
Once created, add the .env file to your .gitignore, this will prevent you from pushing your secrets to GitHub or any other version control service you might be using.
Note: pushing your wallet’s private key to GitHub will result in your fund being stolen by bots. Make sure to keep your secrets…secret.
Now we need to grab our private key, to do so, you’ll need a crypto wallet.
Grab Your Wallet’s Private Key
In this tutorial, we’re going to use MetaMask, as it’s one of the most widely used and easy to set up. If you don’t already have MetaMask installed, here’s a guide on how to create your MetaMask wallet.
Once installed, move to your MetaMask extension and:
- Click on the three dots menu.
- Click on “Account details”.
- Click on “Export Private Key”.
- Insert your Password.
- and copy your private key.

Save The Private Key in the .env file
Go back to the .env file in our project folder and declare a new variable, call it “PRIVATE_VARIABLE” and assign to it the value of your private key:
PRIVATE_KEY="YOUR PRIVATE KEY"Open the hardhat.config.js file and initialize dotenv to gain access to the environment variables contained in the .env file. To do so, at the start of your hardhat.config.js file, import dotenv as follows:
require('dotenv').config()Now, inside the module.exports object, right under the ‘url’ property, add the account we want to use to deploy our Token Smart contract:
module.exports = {
  solidity: "0.8.4",
  networks:{
    mumbai:{
      url: 'YOUR ALCHEMY POLYGON MUMBAI ENDPOINT',
      accounts: [`0x${process.env.PRIVATE_KEY}`]
    }
  }
};
As you can notice, using JavaScript string literals, we appended ‘0x’ to our private key, because Hardhat expects a Hexadecimal string that starts with 0x as a private key, MetaMask on the other hand, gives the prefix for granted, removing it.
We’re also accessing our PRIVATE_KEY variable, using process.env.NAME_OF_VAR.
At this point our hardhat.config.js file should look like this:
require("@nomiclabs/hardhat-waffle");
require('dotenv').config()

task("accounts", "Prints the list of accounts", async (taskArgs, hre) => {
  const accounts = await hre.ethers.getSigners();

  for (const account of accounts) {
    console.log(account.address);
  }
});


module.exports = {
  solidity: "0.8.4",
  networks:{
    mumbai:{
      url: 'https://polygon-mumbai.g.alchemy.com/v2/jD_n5-Vt3zoIDgZX8ui1mtAueDGh4TQn',
      accounts: [`0x${process.env.PRIVATE_KEY}`]
    }
  }
};
Great! Our hardhat.config.js is ready to deploy our contract on Polygon. It’s now time to move the Token code from REMIX to our local dev environment and modify the deployment script.
Let’s start by installing OpenZeppelin in our project.
Add The Token Smart Contract to Your Project
First of all, we’ll need to install OpenZeppelin in our project.
In the terminal, inside the project folder, write:
yarn add @openzeppelin/contractsOnce installed move in the “contracts” folder of our project, and create a new file named Token.sol. Go back to REMIX, copy the Token.sol Contract code we wrote a few paragraphs ago and paste it in the new local Token.sol file.
Note: we’re going to use the Token with a fixed supply for tutorial purposes, the same will apply to all contracts.
The code should look as follows:
// SPDX-License-Identifier: GPL-3.0

pragma solidity ^0.8.0;

import "@openzeppelin/contracts/token/ERC20/ERC20.sol";

contract DevToken is ERC20{
    constructor(uint256 totalSupply) ERC20("DevToken", "DVT"){
        _mint(msg.sender, totalSupply);
    }
}
Now we need to modify the deployment script.
Modify The Deployment Script
In the “scripts” folder, inside the project directory, rename sample-script.js to “deploy.js”, and open it.
Replace the content of deploy.js with the following code:
const hre = require("hardhat");

async function main() {
  const DevToken = await hre.ethers.getContractFactory("DevToken");
  const devToken = await DevToken.deploy("1000000000000000000000000000");

  await devToken.deployed();

  console.log("Token deployed to:", devToken.address);
}

main()
  .then(() => process.exit(0))
  .catch((error) => {
    console.error(error);
    process.exit(1);
  });
Let’s briefly go through what’s going on here:
First of all, we’re importing the Hardhat library, which will give us access to utilities like getContractFactory(). We declare an async function and deploy the token passing as an argument the totalSupply value needed in the Token constructor.
You can read more about deploying with Hardhat in the official docs.
As you can notice the totalSupply is passed as a string (“1000000000000000000000000000”) this because the value overflows the max int value allowed by JavaScript.
Lastly, we await for the devToken to deploy and print its address.
The last few lines are just calling the main() function and exiting in case of error.
Now everything is ready to compile and deploy our cryptocurrency.
Compile and Deploy Your own Cryptocurrency to Polygon Mumbai
First of all, as we did on REMIX, we’ll need to compile our Token Contract to get the Artifacts and allow the getContractFactory() function in deploy.js, to grab our contract.
In the terminal, run:
npx hardhat compileThis creates a new folder in the project root, called artifacts, and populates it with the compiled version of our Token.
Lastly, we’ll need to deploy our contract, to do so, though, we’ll need some MATIC to pay for the Gas fees. Don’t worry, we won’t spend a penny, that’s the reason we’re deploying on a testnet.
Get Test MATIC to deploy your cryptocurrency
Getting some test MATIC is very simple:
- Navigate to faucet.polygon.technology.
- Select the Mumbai network.
- Paste your wallet address.
- Click on “Submit”.
- Wait up to a minute to see the MATIC transferred in your wallet.
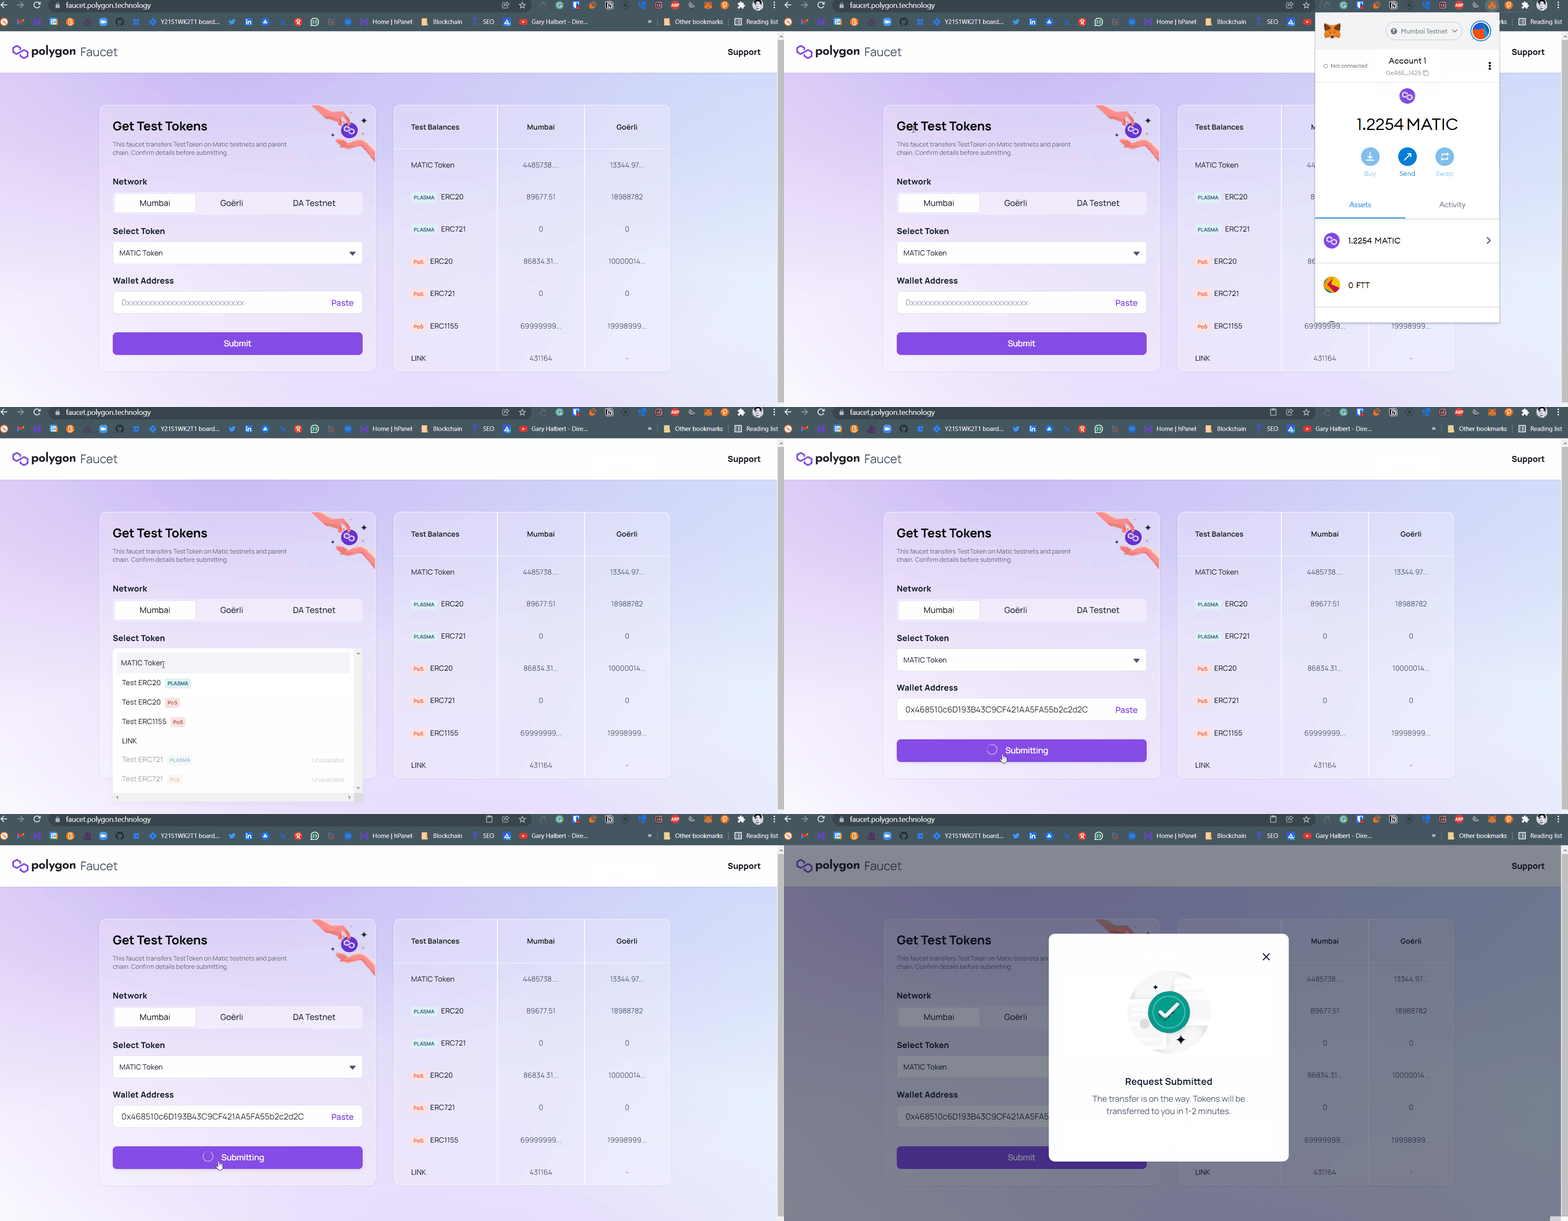
Now we have enough MATIC to deploy our Token Contract.
How to Deploy an ERC20 Token on Polygon Mumbai
Go back to your project folder, and run the following script in the terminal:
npx hardhat run ./scripts/deploy.js --network mumbaiHere we’re telling Hardhat to run our deploy script using the Mumbai network which settings are specified in the hardhat.config.js file.
After a couple of seconds you should see the Token Address on the Mumbai network logged in the terminal:

Excellent! You’ve just deployed your first Token to the Blockchain!
If everything worked as expected, you should now see your newly created cryptocurrency and the minted amount of tokens in your MetaMask wallet or interact with them in your DApp (learn how to develop a decentralized application)
First, though, we’ll need to tell MetaMask how to find our token.
Add Your ERC20 Token to MetaMask
There are two steps involved to visualized your own ERC20 Toke on Metamask do so:
- Add Polygon Mumbai to MetaMask.
- Add the new Token to Metamask.
Refer to this guide to add Polygon Mumbai to MetaMask.
Adding a new Custom Token, on the other hand, is very simple, let’s see how.
When we deployed our Token we logged its on-chain address in the terminal, let’s copy it and move to MetaMask:
- Make sure to be on the Mumbai Testnet
- Scroll to the bottom of the MetaMask extension
- Click on “Import Tokens”
- Paste your token Address
- Click on “Add Custom Token”
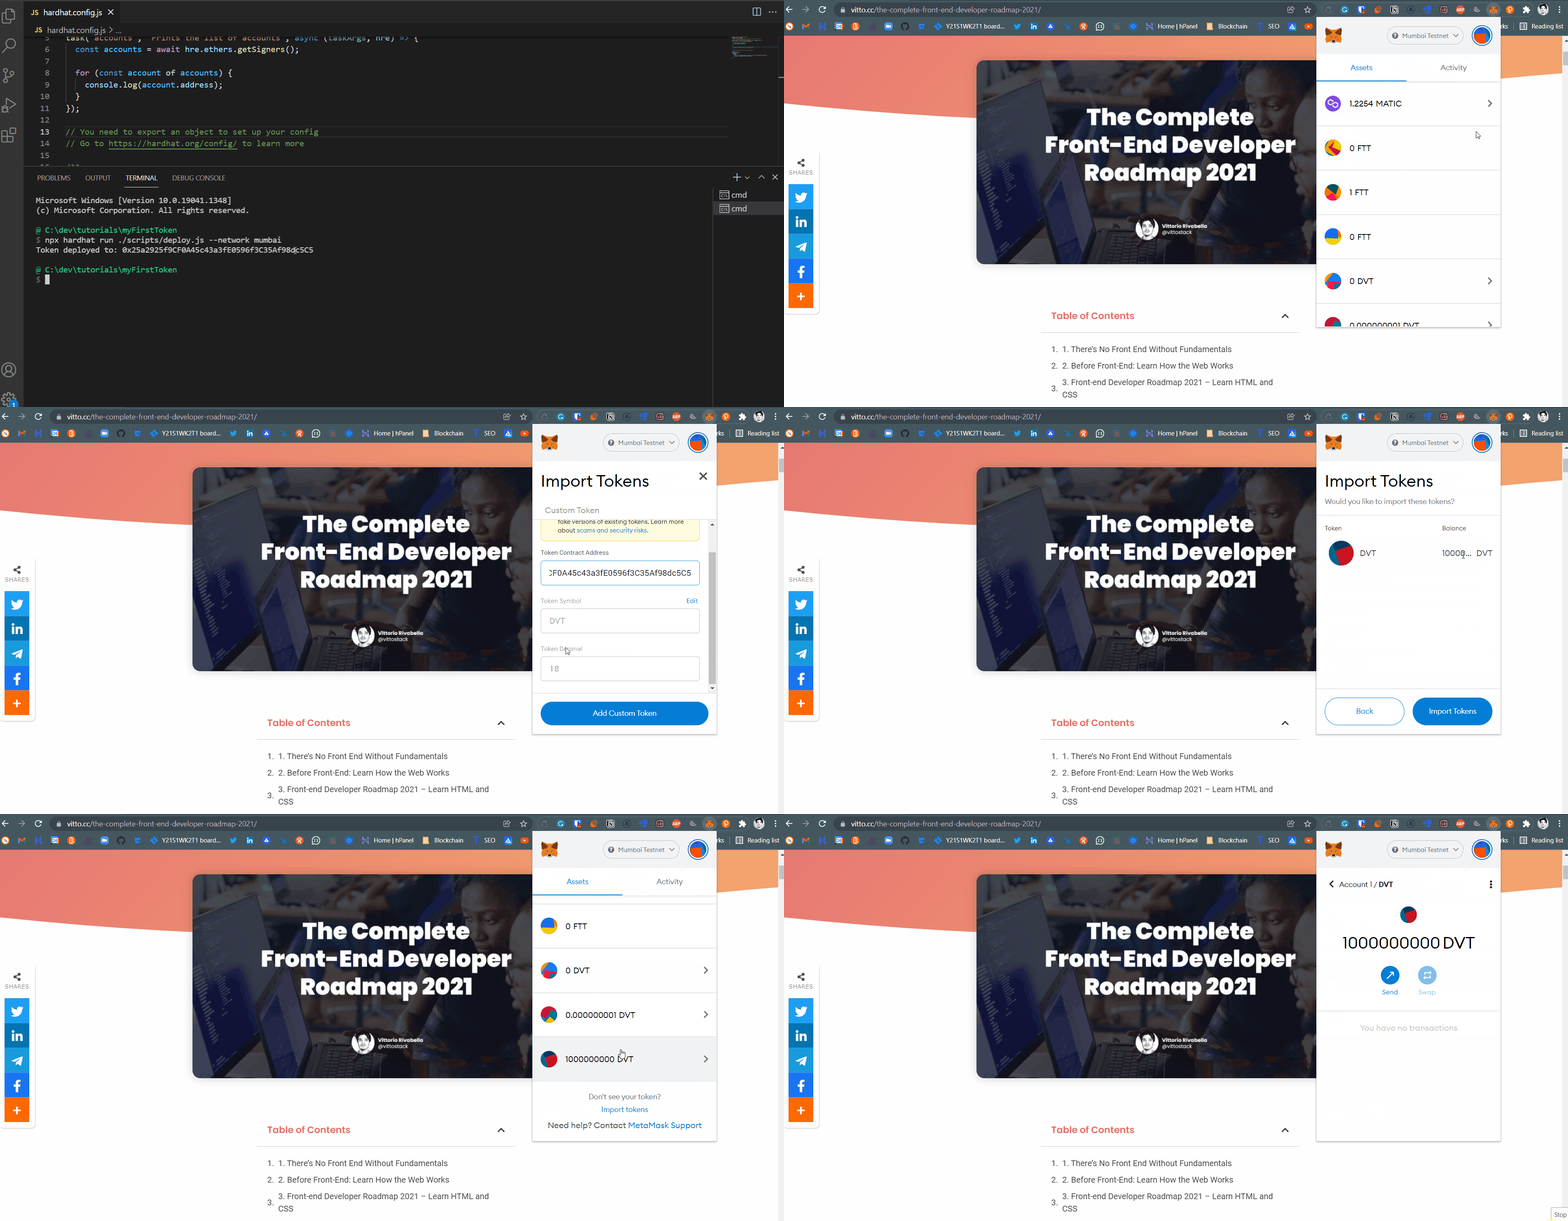
As you can notice, MetaMask will automatically recognize the Token Symbol and the number of decimals.
We did it! You’ve just deployed your first cryptocurrency, congratulations!
Conclusions
I truly hope you’ve how to create and deploy an ERC20 token! If you have any issues, feel free to contact me on Twitter or leave a comment!
Oh, and don’t forget to subscribe to the Email to receive, every week, the best web3 resources to kickstart your career.





27 Responses
Excellent tutorial! Followed it and learned a ton in the process. Thank you!
I think there’s a small typo in the “Set up The Environment With REMIX” section. There shouldn’t be an equals sign in Token.sol (pragma solidity = ^0.8.0;), right? It’s fine in the following code snippets.
Thank you so much for reporting it Guillermo! Sorted 🙂
Beginning mentioned open contact folder. I think its contracts folder.
Thank you so much for reporting it Sreenth! Corrected!
This was really cool! Quick and easy to understand!
Glad to hear that Sam! Thank you for reading!
Very interesting, very well presented…great work Teacher 🙏 thank you
My huge pleasure Jonathan! Thanks for reading!
Great article! This has been really helpful.
I have a question-
In deploy.js , we have used :
const devToken = await DevToken.deploy(“1000000000000000000000000000”);
If we use Token Supply – Capped Modular Supply instead, how will deploy.js change?
In that case you can:
A. Hard code the max supply value and call deploy without any argument
B. Pass the max supply as an argument and insert it when calling deploy!
Hope it helps Anurag!
Awesome!
Yeez Vitto, you are really pushing the community forward with these info and tuts.
Big up.
Hi, First of all great tutorial! second i would like to add the fresh new token as a reward to listening my web radio…like every 20 minutes it gives a token to any listener connected (this is only an example). is it possible to do that? like the bro token of bitrad.io
Woow, this is good and easy to understand. Please i have a question, if i want my token to be usable what do i have to do. Let assume that i did not publish on a testnet.
How can i create my token that can be swap with eth??
Hi, when I try to install ethereum-waffle it returns this error:
npm ERR! code ENOENT
npm ERR! syscall spawn git
npm ERR! path git
npm ERR! errno -4058
npm ERR! enoent Error while executing:
npm ERR! enoent undefined ls-remote -h -t https://github.com/ethereumjs/ethereumjs-abi.git
npm ERR! enoent
npm ERR! enoent
npm ERR! enoent spawn git ENOENT
npm ERR! enoent This is related to npm not being able to find a file.
npm ERR! enoent
Can you help me? Thanks in advance
How much in total does it cost to deploy this
I did this successfully on Goerli testnet, then I changed the url and parameters for mainnet and it went through costing me $180 but the coins still went to testnet 🙁 The only thing I changed was adding the ownable part to the configuration. So I’m really confused how that it possible.
you need to change the contract address to mainnet, also in the network section you also need to change it to your mainnet api key
En el apartado “Cómo crear e implementar un token ERC20” le cambie el nombre al contrato, osea le nombre del token y el símbolo, todo bien pero de compilar y darle a deploy, no me termina en proceso, dice pendiente..
otra cosa, en la cuenta aparece la misma dirección que la que esta en la pagina poque? en que momento me pide la direccion de mi billetera?
me pide primero la contraseña de mi billetera antes que la direccion. hay cosas basicas q no estan explicadas.
Hello Vittorio,
Thank You for sharing this wonderful article.
Step by Step very easy to follow & implement.
After all steps successfully completed, I am facing issue in last step, after adding custom ERC20 token in Metamask, balance is showing as 0 instead of 1000000000.
Can you please help on this.
Thanks
Hi, I have followed your tutorial and managed to deploy my token onto the Polygon Mumbai chain using Uncapped Lazy Supply. How can I connect to the smart contract again so that I can run the issueToken() function?
Thank you very much really for this valuable post. I created two tokens by following your article. Thank you a lot
Great tutorial. Loved it. Thanks for putting the effort into writing this 😀
Of course, thanks for reading it Rajat!
Hello,
Your guidence is wonderful. However, I met some problems here.
I follow this article, but the Hardhat version now is v2.12.3. After I run the line “npx hardhat”, it shows “Create a JavaScript project”, ” Create a TypeScript project”, “Create an empty hardhat.config.js” and “Quit” but no basic sample project.
Please Help me.
Thanks.
Great bro keep it up